content top

mardi, avril 19, 2011

The Effect Of Reflection Text In Photo Filtre


 Hi guys and welcome to a new tutorial of pfs school!. On this tutorial i will show you how to use text with beautyfull effect. Let's sart:
First, open the Photo Filtre studio
Than, go to File --> New or you can use the sortcut (Crtl + N) and you will see this window, here i did use this setting but you can change it like what ever you want 


When you do this step, go to the toolbar and click on Gradient


Choose your setting and click on OK 


 The result will be like this one here:


 Now, choose your text with your own settings and convert the text to image
and right click on the text and do Duplicate


 After that, in the toolbar click the Flip Vertical icon (in the duplicate image)


Text will be just like this but me i did some retouch in colors 


 Note: (I still edit the image duplicate) Here, reduce the opacity of image to 50%


And click on the eraser tool or use the shortcut ( V ), choose Radius in 70 and scroll left the perssure like this picture:


 Than, erase lower half is, until you see the writing reflected a little
Finally, save the picture.


This effect it's very usefull in every designe.
Like every Tutorial this is my applied:


This video will explain to you better (Video in High Quality)


That’s all guys, I hope you find it useful
If you have any doubt or problem, write a comment and i will help you.

Subscrib me and stay updated 

lundi, avril 18, 2011

10 High Floral Brushes Set For Photo Filtre


A Bauty free set of 10 high vector brushes set for Photo Filtre.

THE DOWNLOAD CONTAINS:

Photo Filtre brush set 
Format PNG
Image preview


I hope you like this brushes
If you have any doubt or problem, write a comment and i will help you.
or subscrib me and stay update with more new 


mardi, avril 12, 2011

Text Tool Tutorial in Photo Filtre


Tool text photofiltre is the big weak point compared to photoshop, but I got to create simple text


Local Tool:


Hotkey:
  The command to activate the tool is text (Ctrl + T) or if you prefer, click the icon in horizontal menu in the shape of the letter "T".


1.Font
Nothing is more than the "Font" ... that is the kind of letter, there are several types, with the operating system already has a lot.
2.Font Size
This definition is to change the font size, remember that each source has its proper size, or some small fonts are bad and some bad ones too large.
3.Font Style
Bold: Make the text bold (thicker)
Stroke: It leaves a trace in the text
Italic: Let the text fallen to the side right
Underline: Underlines the text with a line below the text
Here an Exemple:


4. Text Color
This option sets the color of your text
5.Text Alignment
Defines if your text will be positioned on the left, center or right side.
6.Text Angle
This option sets the angle of your text, that is ... the slopes, lying, or standing upright.
This exemple for color, alignment and angle:


7. Antialias
 Many people do not know what this option, this option is to leave or take the end of the text, usually makes this option activated for large text, and off for many small text.
8. Clear Text
Serves to erase all your typed text.
9. Text Input
Here you write the text you're creating the image to appear.
10. Convert Selection
 When you typed the text and click this option, the program will automatically create a selection of your text.
11.  Character Map
Shows a map of all the characters that exist in the "Font" you chose, good option to find special characters like hearts, polka dots, arrows and etc.
 

12. Opacity of the source
When you lower the opacity, the more transparent the text will look (invisible).

13. Spacing (Pitch and Interline) NEW
This option is new version of (X 10.1.0), so it is still in English, it serves to create a space between letters.
Spacing X: Creates a horizontal space the text
Y Spacing: Creates a vertical space of the text

14.Shaded
When enabled, creates a shadow behind the text.
Shift X: Position of shadow to the left or right (-999 to +999).
Shift Y: Position the shade up or down to (-999 to +999).
Color: Sets the shadow color.
Opacity: Set the pressure of the shadow, the smaller the more opacity invisible shadow.
Style: With "ANTIALIAIS" = blurred, with "PLAN" = Nitida, and "DIFFUSE" = dotted.

15.Limit
This option is activated, creates an outline of the letters, and below you define the color of this outline.

16. Blur
  This option is activated, the text is blurry, there are two ways the "LOW" and "HIGH".

17. Shading Style and Negative
  Style: Let the text with a shadow of light and dark, making the text a little bit 3D
Style Negative: Inverts the colors of the text.

18. Pattern
This option is practically the "Text Color" but are not solid colors, textures that are be able to choose when you activated this option. They call this choice of Standard, who is English Pattern, But you can also use textures or even normal images.


This is the end of this tutorial hope you will like it
If you have any doubt or problem, write a comment and i will help you.
Subscribe me and stay update

samedi, avril 09, 2011

How To Use The Balance Filtre


Tool name: Balance.

Description of Tool:This tool serves to make a balance between 1, 2 or 3 colors.


Local Tool:


Color table:
 Below is a table of colors of this tool we can use the percent (%) by up to three colors, ie between (Blue or Red), (Pink or Light Green) and (Yellow or Navy Blue). With the right combination, can have almost any color! for example: orange, brown and so on .... There is no set color gray as black and white.


Here's an exemple:
Below is a picture on the left unedited, and the right have the same image with equibrio colors with the settings (100% and 100% Blue Rose), note that the image was left alone with these colors.


If you have any doubt or problem, write a comment and i will help you.
Subscribe me and stay update

How To Use The Old Photo Filtre

Tool name: Old Photograph.

Description of Tool:This tool is used to age a photograph in whole or part.


Local Tool:


Here's an exemple:
Below we have left an image without editing, and right have the same image with the filter of old photographs.


If you have any doubt or problem, write a comment and i will help you.
Subscribe me and stay update

How To Use The Sepia Filtre

Tool name: Sepia.

Description of Tool: This tool is to let a sepia tone in a photograph for all or part ..


Local Tool:


Here's an exemple:
Below we have left an image without editing, and right have the same image with the Sepia filter.


If you have any doubt or problem, write a comment and i will help you.
Subscribe me and stay update

How To Use The Filtre Grey Scale


Tool name: Grey Scale.

Description of Tool: This tool serves to make the picture for full color without leaving so black and white or only a selected location.


Local Tool:


Here's an exemple:
Below we have left an image without editing, and right have the same image with gray scale filter.


If you have any doubt or problem, write a comment and i will help you.
Subscribe me and stay update

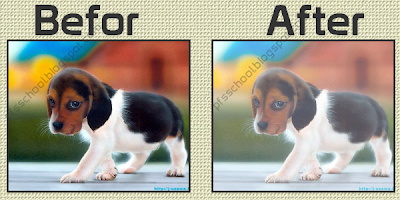
How To Use The Filtre Less Saturation (-)


Tool name: Saturation (-).

Description of Tool: This tool serves to make the picture absorbing of colors, thus that image comes out looking less brighter.


Local Tool:


Here's an exemple:
Below is a picture to the left without issue, and we have the same right image with less saturation.


If you have any doubt or problem, write a comment and i will help you.
Subscribe me and stay update

How To Use The Filtre More Saturation (+)


Tool name: Saturation (+).

Description of Tool: This tool serves to make the picture Saturated with colors, thus that image comes out looking brighter.


Local Tool:


Here's an exemple:
Below is a picture to the left without issue, and we have the same right image with more saturation.


If you have any doubt or problem, write a comment and i will help you.
Subscribe me and stay update

How To Use The Filtre Less Range (-)


Tool name: Gamma correct (-)

Description of Tool: This tool serves to make the picture with less range, thus the image becomes darker (Gamma is the difference in contrast between light and dark tones of an image. Any alteration in the gamma level only affects the means -toned image.)


Local Tool:


 Here's an exemple:

Below we have left an image without editing, and right have the same image with less range


If you have any doubt or problem, write a comment and i will help you.
Subscribe me and stay update

How To Use The Filtre More Range (+)


Tool name: Gamma correct (+)

Description of Tool: This tool serves to make the picture with more range, thus the image becomes clearer (Gamma is the difference in contrast between light and dark tones of an image. Any alteration in the gamma level only affects the means -toned image.)


Local Tool:


 Here's an exemple:

Below we have left an image without editing, and right have the same image with more range


If you have any doubt or problem, write a comment and i will help you.
Subscribe me and stay update

How To Use The Filtre Less Brightness (-)


Tool name: Brightness (-).

Description of Tool: This tool serves to make the picture less bright, with that image comes out looking less bright.


Local Tool:


 Here's an exemple:

Below is an image to the left without issue, and the right have the same picture less bright

 
If you have any doubt or problem, write a comment and i will help you.
Subscribe me and stay update

How To Use The Filtre More Brightness (+)


Tool name: Brightness (+).

Description of Tool: This tool serves to make the picture brighter, with that image comes out looking brighter.


Local Tool:


Here's an exemple:
Below is a picture to the left without issue, and we have the same right image brighter.


If you have any doubt or problem, write a comment and i will help you.
Subscribe me and stay update

mercredi, avril 06, 2011

How To Opening A Document in Photo Filtre


Local Tool:


Detailed Description:
Saving pictures from the internet?
Just click with your RIGHT mouse button over the image you want to save, and select "Save Picture As ..."

How to use:
Click on the Open tool, or if you prefer to use the shortcut (Ctrl + O), select the image you want to edit and click on the "Open" button (See example below).


 Choose your picture and press on open


If you have any doubt or problem, write a comment and i will help you.
Subscribe me and stay update

content top